It is seemingly a simple topic, but many newcomers face this problem. Thus, let’s describe it step-by-step.
Log in and authorize in cPanel at the address that is sent to you in New Account Information message.
There, find Databases section. We see 4 icons.

The easiest way is to use Wizard.
Let’s do that.
So, clicking on MySQL Database Wizard icon in Databases box of cPanel, you go to the first page of the wizard to create a new database, where you shall enter a name of your future database in New Database field (using only Latin characters and numbers, no spaces):
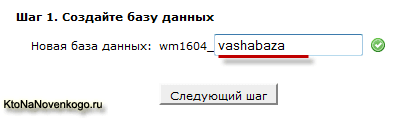
Note that before your database name, a login for your account at the hosting will be automatically added (in this case, wm1604_). After typing the name of the new database, click Next Step button.
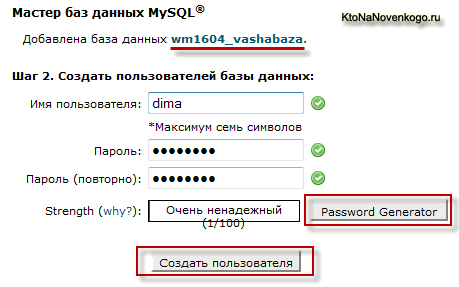
In the window that opens, you will be offered to come up with a name and a password for the database user. In user name field, you can only use Latin characters and numbers with no spaces as well, and the password shall be repeated twice and in case your passwords match, green ticks appear next to their fields. Please note what is written in Strength box. As you can see in the figure above, this box states Very Insecure. That’s bad, because hackers can easily hack such a password.
To generate a complex password which will be very difficult to hack, you can use built-in cPanel password generator by clicking Password Generator. This will open a popup window of password generator offering a complex password option. If you are not satisfied with this password for any reason, then click Generate Password again to generate a new password. By clicking Advanced Options, in additionally opened window, you can specify the parameters defining complexity and content of the password to be generated.
Make sure you copy the password, because you will not see it as visible anymore and therefore will not be able to access the database created. Check the box “I have copied this password in a safe place”, confirming that you have already copied the generated password and click Use Password button that will become active after the box is checked.
The generated password is automatically inserted into both password fields in the window to create a new database user in cPanel. You just need to click Create User button. This opens the third step wizard window to create a database and a user in cPanel. At the top of this window you will see the name of the database created and the name of the newly created user. The username you entered will be added with a login to your account at the hosting (in my case it is wm1604_):
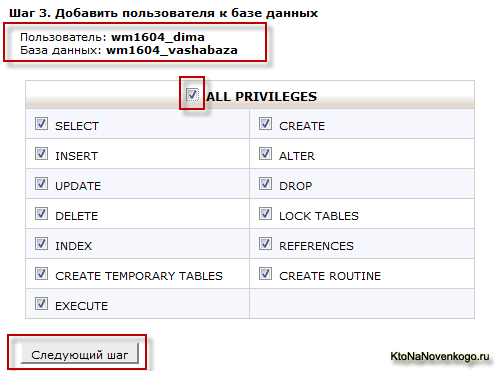
In this window, you will need to set privileges for the database user. For successful installation of your website engine, you will need to create a user with maximum privileges. To do this, check ALL PRIVILEGES box. As a result, all possible privileges will be assigned to this user (privileges boxes will be checked automatically). Click Next Step button.
At the last step of the wizard, you will be provided with the information about newly created database and a user:

If you need to create another database, click the corresponding link in this window, and to return to the main page of cPanel, click Back to Homepage or click Home icon in the upper left corner of the page. This Home icon will be available on any page of cPanel.
That’s it. Some materials, screenshots and ideas were taken from http://ktonanovenkogo.ru/
Links to original article - http://ktonanovenkogo.ru/vokrug-da-okolo/hosting/upravleniya-xostingom-cpanel-raboty-bazami-dannyx-sozdanie-udalenie-baz-dannyx-polzovatelej-phpmyadmin.html
Best regards, Schneider-Host. And remember that we are the best representatives of inexpensive hosting on the Internet.